This is the latest in the Archaeology Made Easy series
LIDAR or Light Detection and Ranging is simply a posh name for an upscaled version of the laser measuring device you can buy from B&Q to carry out DIY
In its simpliest form it is a laser fitted to an aircraft flying parallel with the ground that emits thousands of laser signals which bounce off the ground surface as the aircraft flies over, and are reflected back to a receiver on the aircraft, which are then put together using software into a mosaic giving absolute heights to the ground surface.
The unique value to archaeology is that LIDAR can reveal extremely low lying earthworks, and even a ploughed out ditch that may be invisible on the ground, but is still actually slightly lower than the surrounding land. From an archaeological perspective perhaps the most useful effect of LIDAR is the ability to effectively see below undergrowth and tree cover to the woodland or heath ground surface beneath. From a non-archaeological perspective it is widely used for land management, especially flood plain and watershed management and planning, drainage issues for development, and geology generally.
Until recently LIDAR was a commercial product, and unavailable to non funded research and amateur groups. However recently the Department of Environment has generously made their LIDAR library of 0.5m, 1m, and 2m available for open source use. The file structures available for LIDAR include Digital Elevation Models (DEM), Digital Surface Models (DSM), Digital Terrain Models (DTM), with the latter two being available on the Dept of Environment site. For archaeology DTM is the better option as it creates a 3D effect after processing, and effectively strips off the tree cover, which makes the archaeology easier to interpret.
The following is the procedure to follow:
To process the LIDAR, you will need some sort of GIS mapping software to download the raw data. I use the open source QGIS which I find is excellent, it is a free full feature mapping package. If you haven’t got a GIS you can get QGIS here: http://www.qgis.org/en/site/
Once you have a GIS package you can download and process the LIDAR data. The following is not intended to make you an expert in Graphical Information Systems(GIS), but simply to allow you to open LIDAR to a useful standard. There are plenty of YouTube tutorials on using GIS generally including some for archaeology specifically.
1. Go to the Environmental Agency:
http://environment.data.gov.uk/ds/survey#/download
Zoom into the map, and download the relevant DTM file containing the grid block you want, at whatever resolution, Once downloaded unzip the folder and file it somewhere. Please note, each ZIP file will contain multiple LIDAR tiles, identified by a 4 digit grid reference such as NZ3510, when zooming into the Environmental Agency map, make a note of the 4 digit reference of the grid you are interested in to make it easier to find later in the file.
2. Open your GIS platform, Click on LAYER> ADD Layer> ADD RASTER LAYER, which will bring your document files up. Go to the file you saved your DTM files in, click on the one you want, and a blurry image should appear in the QGIS box.
3. Click on RASTER>TERRAIN> HILLSHADE, and the HIllshade dialogue box should appear. Click on the OUTPUT LAYER and pick a file to bung the processed image in. ( Make sure you put in the full file address, the best way is to do this, is to go to the file itself and click it from there, which will put the full file address into the Output Layer dialogue box for you. . If you only type the basic file name in the Output Layer such as BlackWood or some such name, it will not be able to process and file the data, so full file name including c:/ etc, etc, etc.), the only other thing you need to check is to make sure GeoTIFF is the output format.
You can alter the 3D effect by adjusting the illumination angle in the Hillshade dialogue box, what you are effectively doing is positioning a faux sun to shine across the image. Effectively you can add illumination around 300 degrees of the compass, and with an angle as high as 40 degrees above the horizontal plane, which effectively allows a faux winter sun with long shadows in the low degrees up to a higher spring/ summer sun with short shadows up towards the 40 degrees. Leave it at the default setting initially and see how it looks, you can then open up Hillshade again, and play about with the angles if you need to, until you get the most effective image. Press OK and the image should render and file to the values introduced.
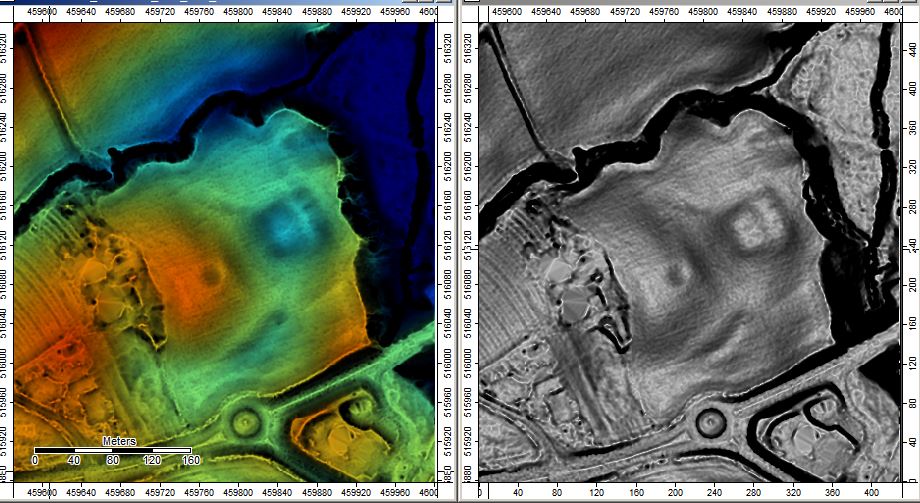
This is the basic technique, it produces the grey scale image as demonstrated below, to achieve the colour image to accentuate which are the lower and higher features, requires further processing, which is a technique for those who wish to develop their expertise in using GIS and LIDAR further, but outside the scope of this basic tutorial.
The image can then be moved to photo editing software like Adobe Photoshop, which allows the image to be manipulated with filters and false colours.
Here are a couple of examples of what can be achieved courtesy of Steve Kaye at Banda Arc Geophysics.